![]() Unlocking smartphone bootloaders isn’t as popular as it used to be, but it’s still an option for those who like to tinker with their technology. You can still unlock the Google Pixel 3 bootloader, even with its new Titan M security chip onboard.
You might want to unlock your bootloader to more easily flash factory images, gain root access to the device, install a custom recovery and custom ROM, or for rescuing your device from a boot-loop or soft-brick.
Be forewarned, Google doesn’t recommend unlocking the bootloader — it can compromise your security. Unlocking the Pixel 3 bootloader also wipes and resets all user data on the phone, so you’ll have to reinstall all your apps, contacts, etc.
Grab the files and get set up
There are a few things you’ll need to do before unlocking your Pixel 3 bootloader. This includes installing the necessary programs and drivers on your computer, and secondly checking your Pixel 3 settings so that it can communicate properly with your PC.
First, grab Android Debug Bridge (adb) and fastboot files and place the folder somewhere easy to locate on your computer. You can grab the combined zip file for Windows here, or macOS, or Linux versions, should you need them. Extract the zip file to somewhere easy to locate, such as C:\abd, on your desktop, or even in your documents folder.
Now you need to put your phone into the right state to talk to adb and unlock the bootloader. First, you need to enable Developer Settings on your Pixel 3. First head to Settings > System > About phone and pressing the Build Number at the bottom until you see a toast saying you’re now a developer.
Unlocking smartphone bootloaders isn’t as popular as it used to be, but it’s still an option for those who like to tinker with their technology. You can still unlock the Google Pixel 3 bootloader, even with its new Titan M security chip onboard.
You might want to unlock your bootloader to more easily flash factory images, gain root access to the device, install a custom recovery and custom ROM, or for rescuing your device from a boot-loop or soft-brick.
Be forewarned, Google doesn’t recommend unlocking the bootloader — it can compromise your security. Unlocking the Pixel 3 bootloader also wipes and resets all user data on the phone, so you’ll have to reinstall all your apps, contacts, etc.
Grab the files and get set up
There are a few things you’ll need to do before unlocking your Pixel 3 bootloader. This includes installing the necessary programs and drivers on your computer, and secondly checking your Pixel 3 settings so that it can communicate properly with your PC.
First, grab Android Debug Bridge (adb) and fastboot files and place the folder somewhere easy to locate on your computer. You can grab the combined zip file for Windows here, or macOS, or Linux versions, should you need them. Extract the zip file to somewhere easy to locate, such as C:\abd, on your desktop, or even in your documents folder.
Now you need to put your phone into the right state to talk to adb and unlock the bootloader. First, you need to enable Developer Settings on your Pixel 3. First head to Settings > System > About phone and pressing the Build Number at the bottom until you see a toast saying you’re now a developer.
![]() Next, head to Settings > System > Developer options. There are two options to tick — USB Debugging so adb can communicate with your phone, and OEM Unlocking so you can unlock the bootloader. Check and confirm both of these options before moving on to the next step.
The final step is to connect your phone to your computer. Plug in the USB Type-C cable, drag down the Notification bar to select the USB Preferences, and set the USB mode for File Transfer.
Unlocking the Pixel 3 bootloader
With your phone’s settings correctly configured and the USB mode set for File Transfer, it’s time to unlock the bootloader.
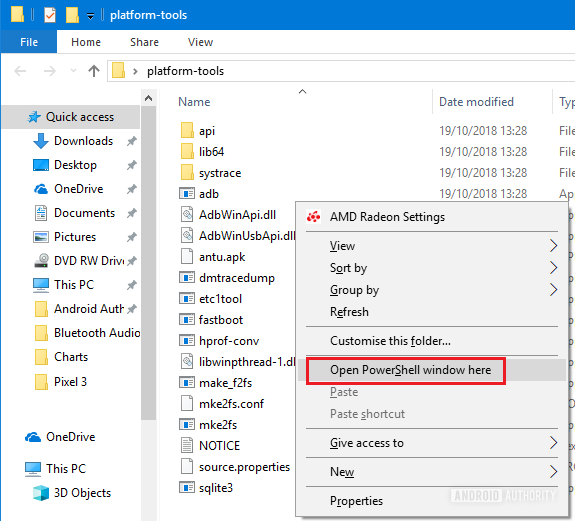
On your PC, head on over to the adb folder you installed earlier. Open up a command prompt window in this folder. On Windows, this is done with a Shift+Right Click and selecting “Open PowerShell window here” on Windows 10 or “Open command window here” on older versions of Windows. It’s now time to enter just a few command line codes to finish the job.
Next, head to Settings > System > Developer options. There are two options to tick — USB Debugging so adb can communicate with your phone, and OEM Unlocking so you can unlock the bootloader. Check and confirm both of these options before moving on to the next step.
The final step is to connect your phone to your computer. Plug in the USB Type-C cable, drag down the Notification bar to select the USB Preferences, and set the USB mode for File Transfer.
Unlocking the Pixel 3 bootloader
With your phone’s settings correctly configured and the USB mode set for File Transfer, it’s time to unlock the bootloader.
On your PC, head on over to the adb folder you installed earlier. Open up a command prompt window in this folder. On Windows, this is done with a Shift+Right Click and selecting “Open PowerShell window here” on Windows 10 or “Open command window here” on older versions of Windows. It’s now time to enter just a few command line codes to finish the job.
 First, make sure your computer can actually find your phone. To do this, enter the following code into the command line window. If you are using Windows 10 and PowerShell, begin each adb command with .\
adb devices
The command prompt window should display your device, but it’ll likely be unauthorized. The Pixel 3 will display a prompt asking you to allow USB debugging. Accept that and re-enter the command above to confirm adb is now authorized to run on your handset. If adb cannot find your phone, make sure you have enabled USB Debugging on your phone, and the Pixel 3 drivers are installed correctly on your computer.
First, make sure your computer can actually find your phone. To do this, enter the following code into the command line window. If you are using Windows 10 and PowerShell, begin each adb command with .\
adb devices
The command prompt window should display your device, but it’ll likely be unauthorized. The Pixel 3 will display a prompt asking you to allow USB debugging. Accept that and re-enter the command above to confirm adb is now authorized to run on your handset. If adb cannot find your phone, make sure you have enabled USB Debugging on your phone, and the Pixel 3 drivers are installed correctly on your computer.
![]() Next, we need to boot the phone into the bootloader, so we can use fastboot to talk to the bootloader and unlock it. Run the following command:
adb reboot bootloader
The Pixel 3 will reboot and you’ll be presented with the fast boot screen.
Next, we need to boot the phone into the bootloader, so we can use fastboot to talk to the bootloader and unlock it. Run the following command:
adb reboot bootloader
The Pixel 3 will reboot and you’ll be presented with the fast boot screen.
![]() Finally, it’s time to unlock the bootloader. Enter this next command into your command line prompt:
fastboot flashing unlock
The Pixel 3 will transition over to another screen detailing the risks of unlocking the bootloader and asking you to confirm you want to proceed. To do so, press the volume up key to change the power key option until it says “Unlock the bootloader.” Finally, press the power button to confirm.
The phone will reboot back into fastboot mode and you should now see the device state status has changed from green locked to red unlocked.
Finally, it’s time to unlock the bootloader. Enter this next command into your command line prompt:
fastboot flashing unlock
The Pixel 3 will transition over to another screen detailing the risks of unlocking the bootloader and asking you to confirm you want to proceed. To do so, press the volume up key to change the power key option until it says “Unlock the bootloader.” Finally, press the power button to confirm.
The phone will reboot back into fastboot mode and you should now see the device state status has changed from green locked to red unlocked.
![]()
![]() Finally, reboot your Pixel 3.
fastboot reboot
The phone will perform a factory reset, wipe, and restart, so prepare to set up your phone just how you like it again. A security warning message will greet you on every boot from now on, but congratulations, your Pixel 3 bootloader is now unlocked.
Finally, reboot your Pixel 3.
fastboot reboot
The phone will perform a factory reset, wipe, and restart, so prepare to set up your phone just how you like it again. A security warning message will greet you on every boot from now on, but congratulations, your Pixel 3 bootloader is now unlocked.
source: https://www.androidauthority.com/unlock-pixel-3-bootloader-915961/
date: Fri, 19 Oct 2018 21:06:53 +0000
Comments
Post a Comment